Fix Sync Fail: Manually Sync Your Fork
Hey guys,
Sync failures can be frustrating, but don't worry, we're here to help you sort it out! This discussion revolves around a sync failure issue reported by Blopa12 and puchuchat. It seems like a recent change in the workflow file of the LobeChat upstream repository has caused GitHub to automatically suspend the scheduled automatic updates. As a result, you'll need to manually sync your fork to get everything back on track. Let's dive into the details and get this fixed!
Due to a change in the workflow file of the LobeChat upstream repository, GitHub has automatically suspended the scheduled automatic update. You need to manually Sync Fork once, please check the Detailed Tutorial.
Understanding the Sync Failure
Sync failures can occur for a variety of reasons, but in this case, it's specifically due to a modification in the workflow file within the upstream LobeChat repository. Workflow files are essential for automating processes in GitHub, such as continuous integration and deployment. When these files are altered, GitHub sometimes suspends automatic updates to ensure that any changes are intentionally synced, preventing unexpected issues or conflicts.
This situation isn't uncommon, especially in actively developed projects like LobeChat. The developers are constantly improving and updating the codebase, which occasionally involves changes to the underlying workflows. While automatic updates are convenient, manual syncing provides an extra layer of control and ensures that you're fully aware of any updates being integrated into your fork. Think of it as a safety measure to keep your local version aligned with the main project while giving you the chance to review changes.
Why Manual Syncing is Necessary
Manual syncing becomes crucial when there are changes in the core configurations of a repository, like workflow files. GitHub's automatic suspension is a proactive step to prevent potential disruptions. By requiring a manual sync, you have the opportunity to understand what has changed and how it might impact your setup. It also allows you to resolve any conflicts that might arise from the changes before they cause problems.
Moreover, manual syncing ensures that you’re not blindly adopting changes that could break your local environment or introduce bugs. This hands-on approach is particularly important if you've made custom modifications to your fork, as you'll want to ensure that the upstream changes integrate smoothly with your customizations. In essence, it's about maintaining control and stability in your development process.
Step-by-Step Guide to Manually Sync Your Fork
Okay, let's get down to business! Here’s a straightforward guide on how to manually sync your fork. Don't worry, it's not as intimidating as it sounds. We'll walk you through each step to make sure you're all set.
Step 1: Navigate to Your Fork
First things first, head over to your forked repository on GitHub. This is your personal copy of the LobeChat repository, where you have the freedom to make changes and experiment without affecting the original project. Make sure you're logged in to your GitHub account, and then find your forked repository in your list of repositories.
Step 2: Check for Divergence
Once you're in your forked repository, take a quick look to see if it's out of sync with the upstream repository. GitHub usually provides a visual indication of this, such as a message saying “This branch is X commits behind the upstream repository.” If you see this, it's a clear sign that you need to sync.
Step 3: Fetch Upstream Changes
The next step is to fetch the changes from the upstream repository. This is like downloading the latest updates without merging them into your code just yet. To do this, you'll need to add the upstream repository as a remote to your local Git setup. Here's how you can do it via the command line:
git remote add upstream https://github.com/lobehub/lobe-chat.git
git fetch upstream
In the first line, you're adding a remote named “upstream” that points to the original LobeChat repository. The second line fetches all the branches and commits from the upstream repository, but they remain separate from your local branches.
Step 4: Merge the Changes
Now that you've fetched the upstream changes, it's time to merge them into your local branch. Typically, you'll want to merge the upstream main branch into your local main branch. Here’s the command to do that:
git checkout main
git merge upstream/main
The first command switches you to your local main branch, and the second command merges the upstream main branch into your current branch. If there are any conflicts, Git will let you know, and you'll need to resolve them manually.
Step 5: Resolve Conflicts (If Any)
Conflicts happen when Git can't automatically decide how to integrate changes. This usually occurs when you've made changes to the same lines of code that have been changed in the upstream repository. Don't panic! Git will mark the conflicting sections in your files, and you'll need to edit those files to resolve the conflicts.
Open each conflicted file in your code editor and look for sections marked with <<<<<<<, =======, and >>>>>>>. These markers indicate the conflicting changes. You'll need to decide which changes to keep and which to discard, then remove the markers. Once you've resolved all the conflicts, save the files.
Step 6: Commit and Push
After merging the changes and resolving any conflicts, it's time to commit your changes and push them to your forked repository. Here’s how:
git add .
git commit -m "Merge upstream changes"
git push origin main
The first command stages all your changes, the second commits them with a descriptive message, and the third pushes the changes to your main branch on your forked repository. And that's it! You've successfully synced your fork.
Visual Guide: Syncing via GitHub UI
For those who prefer a graphical interface, GitHub provides a convenient way to sync your fork directly through the web UI. This method is particularly useful if you're not comfortable with the command line or if you just prefer a visual approach.
Step 1: Navigate to Your Fork
As with the command-line method, start by navigating to your forked repository on GitHub. Make sure you're logged in and that you're viewing your fork, not the original repository.
Step 2: Check for Divergence
GitHub will usually display a message indicating whether your fork is behind the upstream repository. This message often appears at the top of your repository page, letting you know how many commits your fork is behind.
Step 3: Sync Branch Button
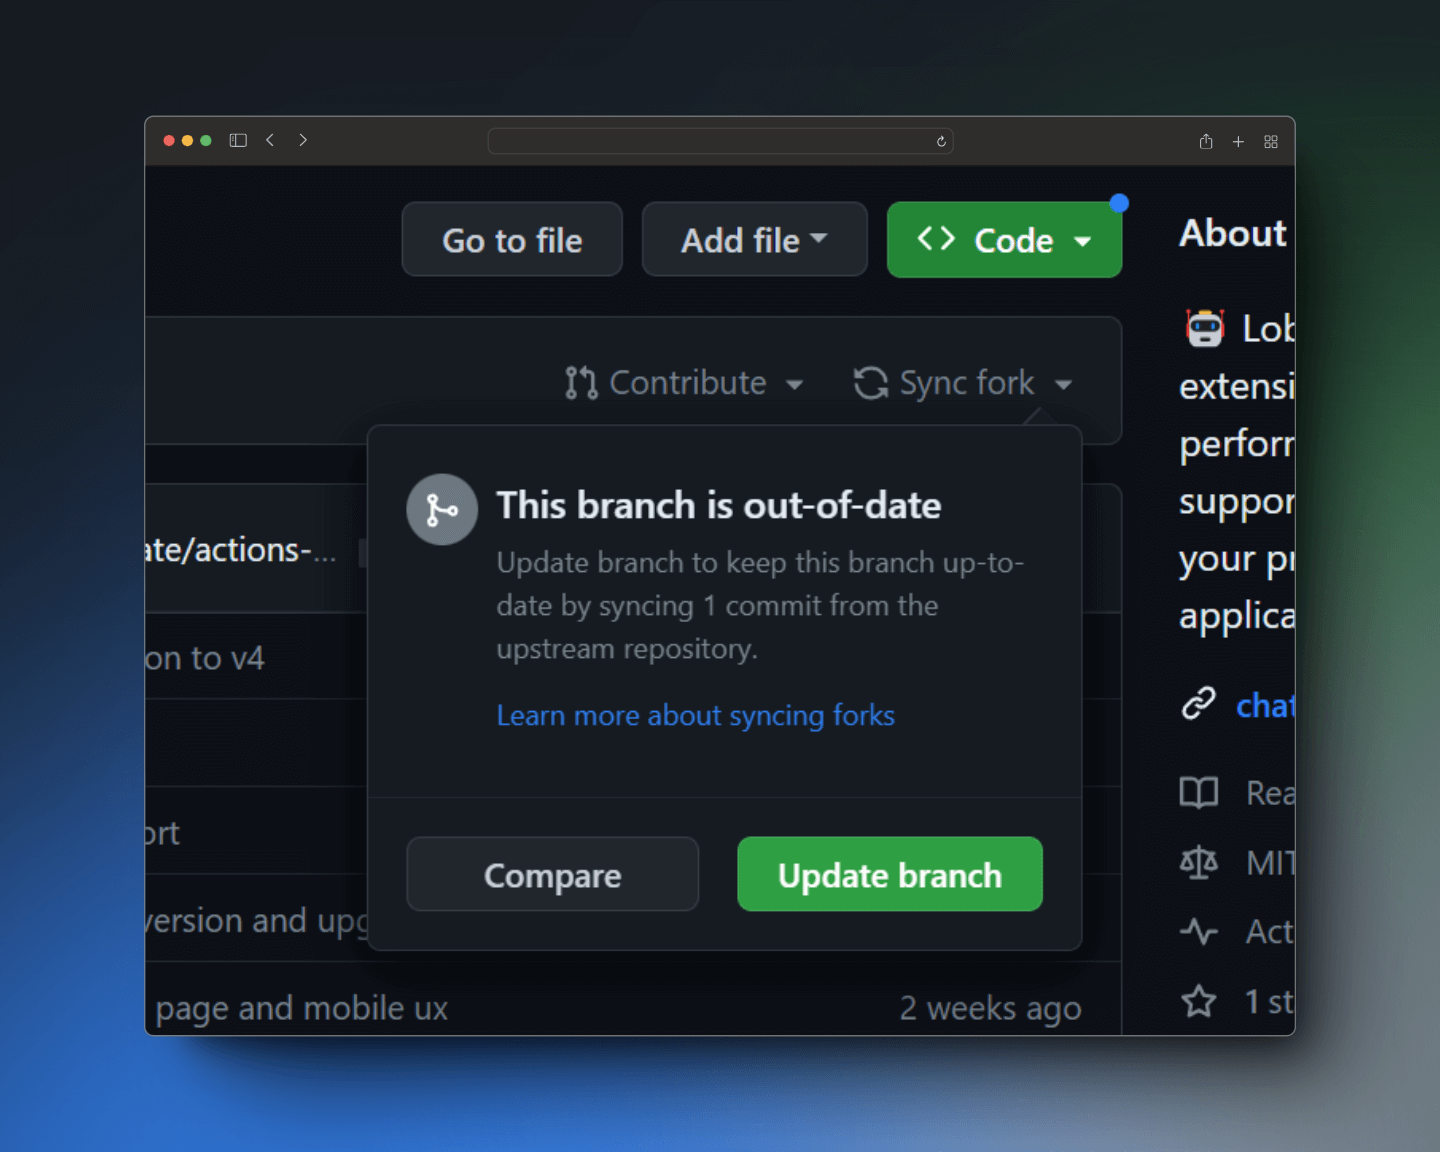
If your fork is behind, you'll see a button labeled “Sync fork” or “Fetch upstream.” This button is your gateway to syncing your fork with the latest changes from the upstream repository. Click on it to proceed.
Step 4: Update Branch
After clicking the “Sync fork” button, you'll typically see an option to “Update branch.” This action will fetch the latest changes from the upstream repository and merge them into your fork. Click on the “Update branch” button to start the syncing process.
Step 5: Resolving Conflicts (If Any)
If there are any conflicts between the changes in the upstream repository and your local changes, GitHub will notify you. Unfortunately, resolving conflicts through the GitHub UI can be a bit tricky, as it doesn't provide a full-fledged code editor. In most cases, you'll need to resolve conflicts locally using the command line or a Git client.
Step 6: Verify the Sync
Once the syncing process is complete, GitHub will display a message confirming that your fork is up to date. You can also check the commit history to ensure that the latest changes from the upstream repository have been merged into your fork.
By following these steps, you can easily keep your fork in sync with the upstream repository using the GitHub UI. This method is a great alternative to the command line, especially for those who are new to Git or prefer a more visual approach.
Why This Happened: Workflow File Changes
So, why did this sync failure happen in the first place? As mentioned earlier, the primary reason is a change in the workflow file of the upstream LobeChat repository. Let's delve a bit deeper into what workflow files are and why modifying them can lead to sync issues.
Understanding Workflow Files
In GitHub, workflow files are YAML files that define automated processes. These processes can range from simple tasks like running tests to more complex operations like deploying code to a server. Workflows are triggered by events, such as a push to the repository, a pull request being opened, or a scheduled event.
Workflow files are stored in the .github/workflows directory in your repository. They specify a series of jobs, and each job consists of one or more steps. These steps can include running shell commands, executing scripts, or using pre-built actions available in the GitHub Marketplace.
Impact of Workflow File Changes
When a workflow file is modified, it can have a significant impact on the automated processes in the repository. Changes might include updating dependencies, altering the build process, or adding new steps to the workflow. While these changes are often necessary to improve the project, they can sometimes cause compatibility issues or conflicts.
In the case of LobeChat, a change in the workflow file likely affected the automatic update process for forks. GitHub's automatic suspension of updates is a safety mechanism to prevent potentially disruptive changes from being automatically applied to forks without the user's knowledge.
Best Practices for Workflow File Changes
To minimize the risk of sync failures and other issues related to workflow file changes, it's essential to follow some best practices:
- Communicate Changes: If you're modifying a workflow file in a shared repository, communicate the changes to your team or the community. This helps others understand the impact of the changes and prepare for any necessary adjustments.
- Test Changes: Before merging changes to a workflow file, test them thoroughly. You can use GitHub Actions to run your workflows and ensure they're working as expected.
- Use Version Control: Keep your workflow files under version control, just like your other code files. This allows you to track changes, revert to previous versions if necessary, and collaborate effectively with others.
- Review Changes: Have someone review your workflow file changes before merging them. A fresh pair of eyes can often catch potential issues that you might have missed.
By understanding the role of workflow files and following these best practices, you can reduce the likelihood of sync failures and ensure a smoother development process.
Need More Help? Resources and Support
Alright, guys, if you're still facing issues or just want to dive deeper into the topic, there are plenty of resources available to help you out. Syncing forks and dealing with Git-related issues can sometimes be tricky, but don't worry, you're not alone! Let's take a look at some of the best places to find support and information.
Official Documentation
First off, the official documentation for Git and GitHub is your best friend. Seriously, these resources are comprehensive and cover just about everything you need to know. Here are a few key links to get you started:
- Git Documentation: The official Git documentation is incredibly detailed and covers everything from basic commands to advanced concepts. You can find it at git-scm.com/doc.
- GitHub Docs: GitHub's documentation provides in-depth guides on using GitHub features, including forking, syncing, and resolving conflicts. Check it out at docs.github.com.
Online Tutorials and Guides
If you prefer a more hands-on approach, there are tons of online tutorials and guides that walk you through the process of syncing forks and managing Git repositories. Here are a few popular platforms:
- GitHub Learning Lab: GitHub Learning Lab offers interactive courses that teach you how to use Git and GitHub. It's a fantastic resource for beginners and experienced users alike. You can find it at lab.github.com.
- Atlassian Git Tutorials: Atlassian provides a series of clear and concise tutorials on Git, covering topics like branching, merging, and resolving conflicts. Check them out at www.atlassian.com/git.
- YouTube: YouTube is a treasure trove of video tutorials. Search for “sync GitHub fork” or “resolve Git conflicts” to find step-by-step guides.
Community Forums and Discussion Boards
Sometimes, the best help comes from fellow developers who have faced similar issues. Community forums and discussion boards are great places to ask questions, share solutions, and connect with other users. Here are a few communities you might find helpful:
- Stack Overflow: Stack Overflow is a Q&A site for programmers and developers. You can ask questions about Git, GitHub, and any other programming-related topics. Visit stackoverflow.com.
- GitHub Community Forum: GitHub has its own community forum where you can discuss GitHub-related topics, including forking and syncing. You can find it at github.community.
LobeChat Specific Resources
Since this issue originated with the LobeChat repository, it's also worth checking out LobeChat's specific resources:
- LobeChat Wiki: The LobeChat wiki provides detailed instructions on syncing your fork, along with other helpful information. You can find it at LobeChat Upstream Sync Wiki.
- LobeChat Discussions: The LobeChat repository's discussions section is a great place to ask questions and get help from the LobeChat community. Check it out at the top of this article.
By leveraging these resources, you'll be well-equipped to tackle any sync issues and keep your fork up to date. Remember, everyone encounters challenges with Git from time to time, so don't hesitate to ask for help and keep learning!
Conclusion
So, there you have it! Sync failures due to workflow file changes can be a bit of a hassle, but they're definitely manageable with the right steps and resources. Remember, the key is to understand why the failure occurred, follow the manual sync process carefully, and don't hesitate to seek help when needed.
We've covered the importance of manual syncing, provided a detailed guide on how to sync your fork via the command line and GitHub UI, and explained why workflow file changes can lead to these issues. Plus, we've shared a bunch of resources to help you troubleshoot and learn more about Git and GitHub.
By staying proactive and keeping your fork in sync, you'll ensure a smoother development experience and be ready to contribute effectively to projects like LobeChat. Happy coding, and remember, we're all in this together! If you have any more questions or run into further issues, feel free to reach out to the community or consult the resources we've mentioned. You've got this!